> ## Documentation Index
> Fetch the complete documentation index at: https://docs.assesskit.com/llms.txt
> Use this file to discover all available pages before exploring further.
# Flow View
> Connect components and control experimental flow with visual diagrams
 # Flow View
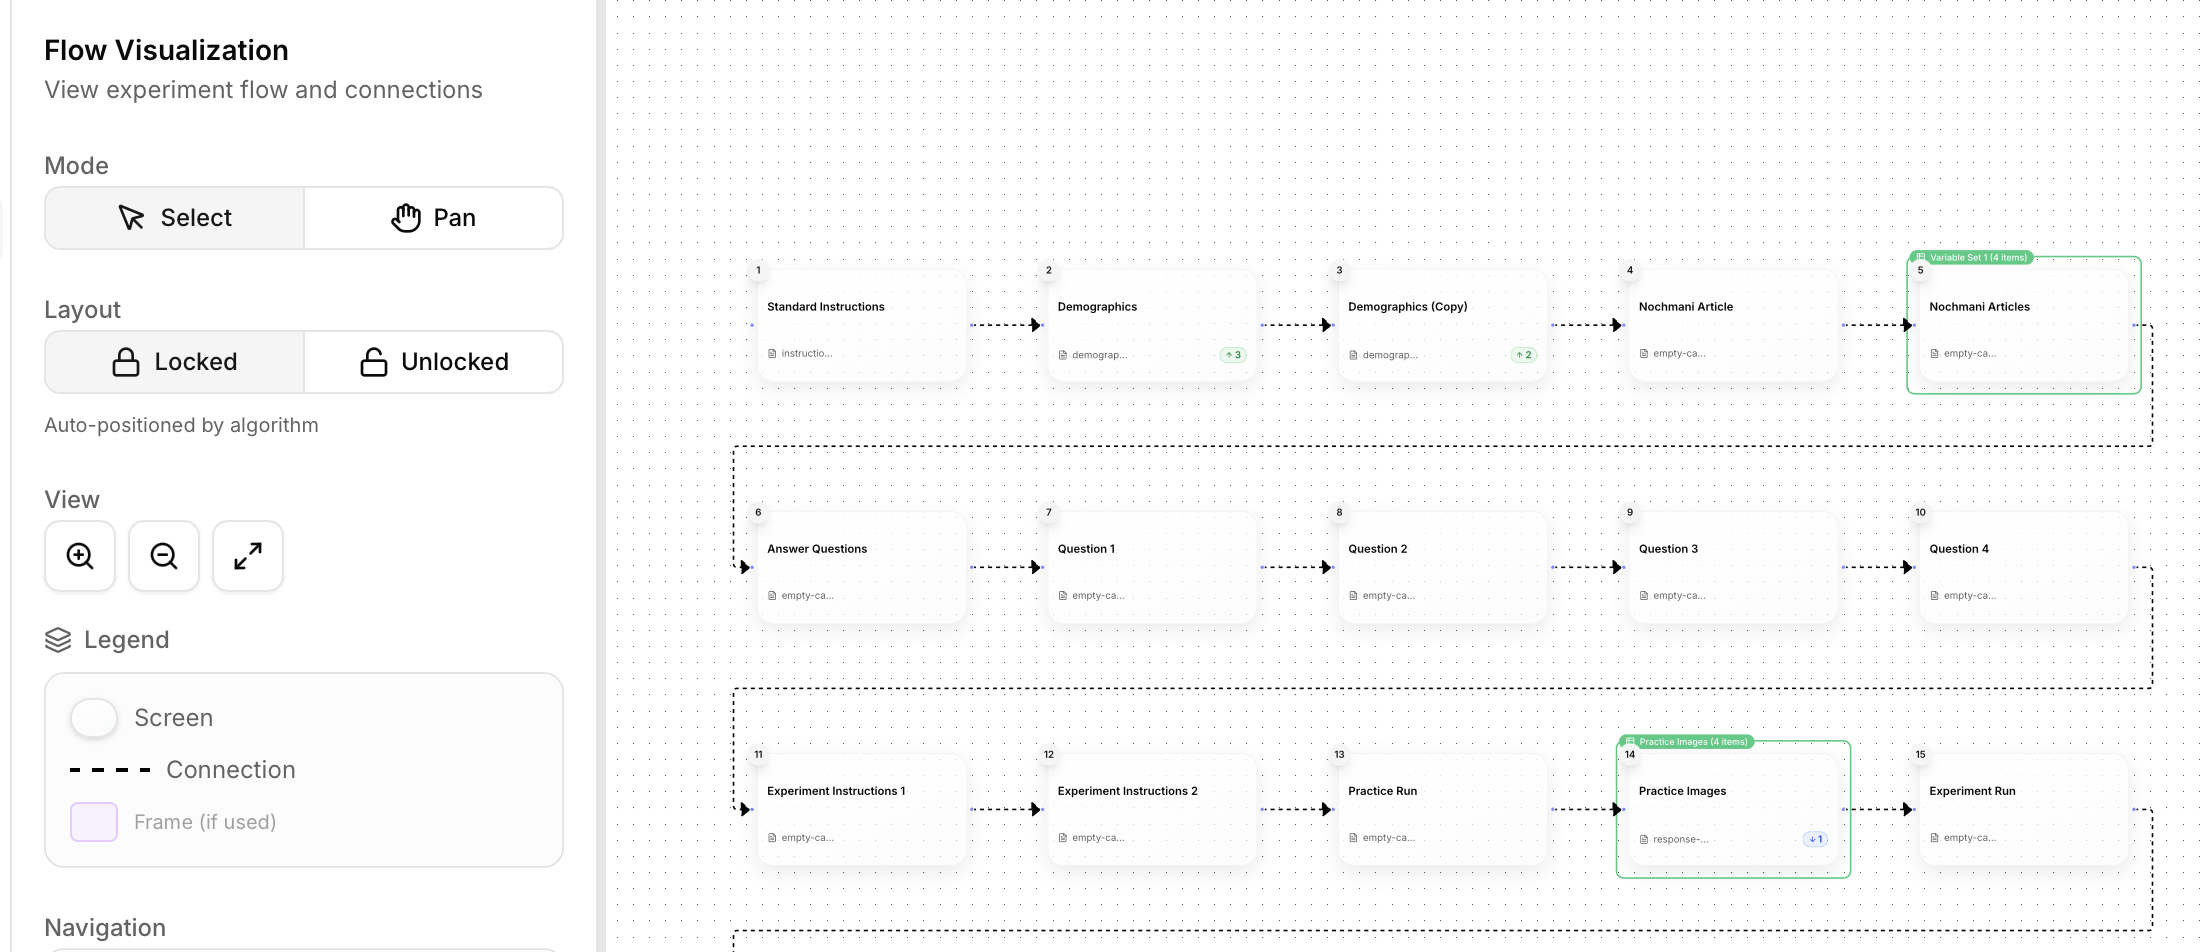
The Flow view provides a visual diagram of your experiment's structure, showing how components connect and flow from one to another. Create loops, randomize trials, and set up conditional branching - all visualized in an intuitive flowchart.
## Overview
The Flow view helps you:
* **See the big picture** - Visual representation of entire experiment
* **Connect components** - Draw connections between screens
* **Create frames** - Group components for loops and randomization
* **Understand flow logic** - See how participants move through your experiment
* **Debug structure** - Identify missing connections or flow issues
**When to use the Flow view:**
* Connecting components in sequence
* Creating loops for repeated trials
* Setting up randomization
* Visualizing experiment structure
* Planning conditional branching
## Understanding Flow Diagrams
The flow diagram shows your experiment as a **flowchart** with:
### Nodes
Each **node** represents one component in your experiment:
* **Component name** - Displayed on the node
* **Component type** - Icon indicating type (stimulus, response, instruction, etc.)
* **Screen number** - Sequential order number
* **Status indicators** - Warnings if component has issues
### Connections
**Arrows** between nodes show how the experiment flows:
* **Sequential arrows** - Solid line = automatic progression
* **Conditional arrows** - Dashed line = conditional branching
* **Loop arrows** - Curved line = return to earlier component
### Frames
**Boxes** around groups of nodes represent frames:
* **Loop frames** - Indicated with "Loop ×N" label
* **Randomization frames** - Indicated with shuffle icon
* **Per-stimulus frames** - Indicated with variable icon
* **Conditional frames** - Indicated with branch icon
## Connecting Components
Create the flow of your experiment by connecting components together.
### Sequential Connections
The most common connection type: one component after another.
**How to create:**
1. Click the **output port** (right side) of first component
2. Drag to the **input port** (left side) of next component
3. Release to create connection
4. Arrow appears showing flow direction
**Example sequence:**
```
Instructions → Fixation → Stimulus → Response → Feedback → End
```
### Auto-Connect
When you add components in Timeline view, they automatically connect in sequence. The Flow view visualizes these connections.
### Removing Connections
To remove a connection:
1. Click the connection arrow
2. Press `Delete` or `Backspace`
3. Or right-click and select "Delete Connection"
### Rearranging Flow
The flow diagram auto-layouts for clarity, but you can:
* **Zoom in/out** - Mouse wheel or zoom controls
* **Pan** - Click and drag empty space
* **Fit to view** - Button to see entire flow at once
* **Auto-layout** - Reorganize nodes automatically
## Frames
Frames are powerful tools for controlling how components repeat, randomize, or branch. Think of frames as containers that apply special logic to the components inside them.
### Loop Frames
Repeat a sequence of components multiple times.
**What they're for:**
* Practice trials (repeat 5 times)
* Experimental blocks (repeat 20 times)
* Multi-trial tasks (repeat 160 times)
* Any repeated sequence
**How to create:**
1. Select components to loop (click first, then Shift+click last)
2. Right-click → "Create Loop Frame"
3. Set repeat count (e.g., 20)
4. Components now enclosed in loop frame box
**Properties:**
* **Repeat count** - How many times to loop (1-1000)
* **Loop name** - Descriptive label (e.g., "Practice Block")
* **Iteration tracking** - Track which iteration participant is on
**Example:**
```
[Start Loop: 20 times]
→ Fixation (500ms)
→ Stimulus (2000ms)
→ Response (until keypress)
→ Feedback (1000ms)
[End Loop]
```
**Tip:** For different stimuli each iteration, use Variables view to define per-trial parameters instead of creating 20 separate components.
### Randomization Frames
Shuffle the order of components randomly.
**What they're for:**
* Randomized trial order
* Counterbalancing conditions
* Unpredictable sequences
* Preventing order effects
**How to create:**
1. Select components to randomize
2. Right-click → "Create Randomization Frame"
3. Components will appear in random order each time
**Properties:**
* **Randomization seed** - For reproducible randomization (optional)
* **Constraints** - Prevent certain orders (e.g., no more than 3 consecutive same type)
**Example:**
```
[Randomize these 3 components]
→ Condition A
→ Condition B
→ Condition C
[End Randomization]
Each participant sees different order: C→A→B or B→C→A, etc.
```
**Combining with loops:**
```
[Loop: 20 times]
[Randomize: 3 conditions]
→ Condition A
→ Condition B
→ Condition C
[End Randomize]
[End Loop]
Result: 60 total trials (20 of each condition), randomized order
```
### Per-Stimulus Frames
Link components to a set of stimuli for automatic trial generation.
**What they're for:**
* Image-based tasks (show each image from a set)
* Word lists (present each word once)
* Stimulus-driven experiments
* Simple variable substitution
**How to create:**
1. Upload stimuli to media library
2. Select component(s) to vary
3. Right-click → "Create Per-Stimulus Frame"
4. Select stimulus set from media library
5. Map stimuli to component elements
**Properties:**
* **Stimulus source** - Which media library folder
* **Stimulus count** - How many stimuli (auto-detected)
* **Randomize** - Shuffle stimulus order
* **Sampling** - Present subset of stimuli
**Example:**
```
[Per-Stimulus: 24 face images]
→ Fixation
→ Face Stimulus [pulls from stimulus set]
→ Response
[End Per-Stimulus]
Result: 24 trials, one for each face image
```
**Note:** For more complex trial variations (multiple parameters per trial), use the Variables view instead of Per-Stimulus frames.
### Conditional Frames
Branch to different components based on participant responses.
**What they're for:**
* Adaptive testing (adjust difficulty based on performance)
* Until-correct loops (repeat until participant answers correctly)
* Branching surveys (different questions based on previous answers)
* Personalized experiment paths
**How to create:**
1. Select components for conditional logic
2. Right-click → "Create Conditional Frame"
3. Choose condition type:
* **Until correct** - Repeat until correct response
* **Max attempts** - Limit number of tries
* **Custom condition** - Based on any variable
**Condition types:**
#### Until-Correct Loop
Repeat component until participant responds correctly.
**Properties:**
* **Max attempts** - Give up after N tries (prevents infinite loops)
* **Feedback** - Show why incorrect
* **Fallback** - What to do after max attempts reached
**Example:**
```
[Until Correct, max 3 attempts]
→ Question Component
→ Feedback (if incorrect)
[End Condition]
→ Next Component (after correct or max attempts)
```
#### Max Attempts Loop
Repeat up to N times regardless of correctness.
**Use case:** Limited practice trials
**Example:**
```
[Max 5 attempts]
→ Practice Trial
[End Condition]
→ Begin Main Experiment
```
#### Custom Condition
Branch based on any variable value.
**Example:**
```
If accuracy > 80%:
→ Hard Difficulty Block
Else:
→ Easy Difficulty Block
```
**Properties:**
* **Condition expression** - Variable comparisons
* **True path** - Components if condition met
* **False path** - Components if condition not met
## Frame Operations
### Creating Frames
1. **Select components:**
* Click first component
* Hold Shift and click last component (selects range)
* Or drag box around components
2. **Create frame:**
* Right-click selection
* Choose frame type from menu
3. **Configure frame:**
* Set properties in right panel
* Name frame descriptively
### Adding Components to Frames
**Add after creation:**
1. Drag component into frame boundary
2. Component becomes part of frame
3. Frame resizes to fit
**Add during creation:**
1. Create frame first (empty)
2. Add components inside frame boundary
3. Components auto-add to frame
### Removing Components from Frames
**Option 1: Remove one component**
* Drag component outside frame boundary
* Component disconnects from frame
**Option 2: Ungroup frame**
* Right-click frame → "Ungroup"
* Frame dissolves, components remain with connections
### Deleting Frames
To delete frame but keep components:
* Right-click frame → "Delete Frame"
* Components remain, frame logic removed
To delete frame AND components inside:
* Select frame
* Press Delete
* Confirm deletion
### Nested Frames
Frames can contain other frames for complex structures.
**Example: Nested Loops + Randomization**
```
[Loop: 5 blocks]
→ Block Instructions
[Loop: 10 trials per block]
[Randomize: 3 conditions]
→ Condition A
→ Condition B
→ Condition C
[End Randomize]
[End Loop]
→ Block Break
[End Loop]
Result: 5 blocks × 10 trials × 3 conditions (randomized within each block)
```
**Nested frame limit:** Up to 3 levels deep (prevents excessive complexity)
## Viewing and Navigation
### Zoom Controls
* **Zoom in** - Mouse wheel up or `+` button
* **Zoom out** - Mouse wheel down or `-` button
* **Fit to view** - Zoom to show all components
* **Zoom to selection** - Zoom to selected components
### Pan and Navigate
* **Pan** - Click and drag on empty space
* **Minimap** - Small overview in corner shows position in large flows
* **Jump to component** - Search and auto-pan to specific component
### Auto-Layout
Click "Auto-Layout" to reorganize flow diagram:
* **Horizontal layout** - Left to right flow (default)
* **Vertical layout** - Top to bottom flow
* **Hierarchical** - Shows nested frames clearly
* **Compact** - Minimize space between nodes
Auto-layout runs automatically when you add/remove components, but you can re-run manually if needed.
### Selecting Components
From the flow diagram:
1. Click component node
2. Right panel shows component properties
3. Edit properties without leaving Flow view
**Multi-select:**
* Hold Shift and click multiple nodes
* Or drag box around multiple nodes
* Apply frame or alignment to all
## Inter-Trial Fixation
Add fixation crosses or blank screens between trials automatically.
**What it's for:**
* Eye fixation point before stimulus
* Mental reset between trials
* Timing marker
* Standard cognitive neuroscience practice
**How to add:**
1. Select frame (e.g., loop frame)
2. Enable "Inter-trial fixation" in frame properties
3. Configure fixation settings
**Properties:**
* **Enabled** - Turn on/off
* **Duration** - How long fixation shows (typically 500-1000ms)
* **Symbol** - Choose: `+` (cross), `•` (dot), `×` (X)
* **Color** - Usually black or white depending on background
* **Size** - Font size of symbol
**Example:**
```
[Loop: 20 trials, inter-trial fixation: 500ms, +]
→ Stimulus
→ Response
[End Loop]
Actual flow:
Trial 1: Fixation (500ms) → Stimulus → Response
Trial 2: Fixation (500ms) → Stimulus → Response
... (repeat)
```
**Tip:** Inter-trial fixation is added *before* each iteration automatically. You don't need to create separate fixation components.
## Common Flow Patterns
### Linear Sequence
Simplest flow: components in order, no repeats.
**Use case:** Simple survey, single-trial experiment
**Structure:**
```
Intro → Consent → Instructions → Task → Debrief
```
**How to build:**
* Add components in Timeline view
* Auto-connects in sequence
* Verify in Flow view
### Randomized Trials
Shuffle trial order to prevent order effects.
**Use case:** Multi-condition experiments, counterbalancing
**Structure:**
```
Instructions → [Randomize: Condition A, B, C] → Debrief
```
**How to build:**
1. Add all trial components
2. Select trials to randomize
3. Create randomization frame
### Practice Trials Followed by Test Trials
Standard cognitive task structure.
**Structure:**
```
Instructions → Practice Trials (5 reps, feedback) → Begin Main Task → Test Trials (100 reps, no feedback)
```
**How to build:**
1. Create practice sequence with feedback
2. Add loop frame (5 reps)
3. Add transition instruction
4. Create test sequence without feedback
5. Add loop frame (100 reps)
### Conditional Branching Based on Performance
Adapt difficulty based on accuracy.
**Structure:**
```
Calibration Block →
If accuracy > 75%: Hard Block
Else: Easy Block
```
**How to build:**
1. Create calibration trials
2. Calculate accuracy
3. Add conditional frame
4. Define two paths (hard/easy)
5. Connect to appropriate block
### Multi-Block Experiment with Breaks
Long experiments need periodic breaks.
**Structure:**
```
[Loop: 5 blocks]
→ Block Instructions
→ [Loop: 40 trials] → Trial Sequence [End Loop]
→ Break Screen (30 sec rest)
[End Loop]
```
**How to build:**
1. Create single trial sequence
2. Add loop frame for trials per block (40)
3. Add break component after loop
4. Add block loop frame around entire structure (5 blocks)
### Blocked vs. Randomized Design
**Blocked design:** All trials of one condition, then all of another
```
[Block 1: Condition A, 50 trials] → [Block 2: Condition B, 50 trials]
```
**Randomized design:** Conditions intermixed
```
[Randomize and Loop: 100 trials of mixed A/B conditions]
```
**How to choose:**
* **Blocked:** When conditions require different instructions or setups
* **Randomized:** To prevent order effects and strategies
## Tips and Best Practices
### When to Use Frames vs. Timeline Variables
**Use Loop Frames when:**
* Simple repetition of same sequence
* You don't need per-trial parameter variation
* Less than \~10 trials
**Use Timeline Variables when:**
* Different stimuli/parameters each trial
* 20+ trials with systematic variation
* Need to import trial lists from CSV
* Complex trial structures
**Example:** For a 160-trial Stroop task, use Timeline Variables (not a 160-iteration loop frame).
### Organizing Complex Experiments
For experiments with many components:
1. **Name frames clearly** - "Practice Block", "Main Task", "Condition A Trials"
2. **Use Timeline folders** - Group components visually in Timeline view
3. **Collapse frames** - Hide frame contents in Flow view for overview
4. **Document flow** - Add text notes explaining branching logic
5. **Modular design** - Build and test each section separately
### Testing Your Flow Logic
Before sharing experiment:
1. **Trace paths** - Mentally walk through each possible participant path
2. **Check for dead ends** - Ensure all paths lead to experiment end
3. **Verify frame properties** - Loop counts, randomization settings correct
4. **Test conditionals** - Try all branches (high/low accuracy, different responses)
5. **Preview mode** - Run through experiment as participant
**Common flow errors to check:**
* Missing connections (component doesn't advance)
* Infinite loops (no exit condition)
* Unreachable components (no path leads to them)
* Wrong loop counts (10× instead of 100×)
### Performance Considerations
For very large experiments (200+ components):
* **Use variables instead of components** - 160 variable rows vs. 160 components
* **Minimize frame nesting** - Keep to 2-3 levels max
* **Simplify flow** - Reduce unnecessary branches
* **Test performance** - Preview with full trial count
### Frame Naming Conventions
Use clear, descriptive names:
**Good names:**
* "Practice Trials (5 reps)"
* "Main Task Block 1"
* "Randomized Conditions A/B/C"
* "Until Correct (max 3 attempts)"
**Poor names:**
* "Loop 1"
* "Frame"
* "Randomize"
* "Test"
## Flow View Limitations
**What Flow view CAN'T do:**
* Edit component content (use Screens view)
* Configure timing (use Timeline view)
* Define trial variables (use Variables view)
* Run experiment (use Preview)
**Flow view is for structure only** - it visualizes and controls how components connect, but not what's inside each component.
***
## Next Steps
Now that you understand the Flow view, explore other views:
Design component content and layout
Control timing and trial organization
Define trial-by-trial parameter variation
Test your experiment flow
The Flow view gives you complete control over your experiment's structure. Create sophisticated experimental designs with loops, randomization, and branching - all visualized in an intuitive flowchart.
# Flow View
The Flow view provides a visual diagram of your experiment's structure, showing how components connect and flow from one to another. Create loops, randomize trials, and set up conditional branching - all visualized in an intuitive flowchart.
## Overview
The Flow view helps you:
* **See the big picture** - Visual representation of entire experiment
* **Connect components** - Draw connections between screens
* **Create frames** - Group components for loops and randomization
* **Understand flow logic** - See how participants move through your experiment
* **Debug structure** - Identify missing connections or flow issues
**When to use the Flow view:**
* Connecting components in sequence
* Creating loops for repeated trials
* Setting up randomization
* Visualizing experiment structure
* Planning conditional branching
## Understanding Flow Diagrams
The flow diagram shows your experiment as a **flowchart** with:
### Nodes
Each **node** represents one component in your experiment:
* **Component name** - Displayed on the node
* **Component type** - Icon indicating type (stimulus, response, instruction, etc.)
* **Screen number** - Sequential order number
* **Status indicators** - Warnings if component has issues
### Connections
**Arrows** between nodes show how the experiment flows:
* **Sequential arrows** - Solid line = automatic progression
* **Conditional arrows** - Dashed line = conditional branching
* **Loop arrows** - Curved line = return to earlier component
### Frames
**Boxes** around groups of nodes represent frames:
* **Loop frames** - Indicated with "Loop ×N" label
* **Randomization frames** - Indicated with shuffle icon
* **Per-stimulus frames** - Indicated with variable icon
* **Conditional frames** - Indicated with branch icon
## Connecting Components
Create the flow of your experiment by connecting components together.
### Sequential Connections
The most common connection type: one component after another.
**How to create:**
1. Click the **output port** (right side) of first component
2. Drag to the **input port** (left side) of next component
3. Release to create connection
4. Arrow appears showing flow direction
**Example sequence:**
```
Instructions → Fixation → Stimulus → Response → Feedback → End
```
### Auto-Connect
When you add components in Timeline view, they automatically connect in sequence. The Flow view visualizes these connections.
### Removing Connections
To remove a connection:
1. Click the connection arrow
2. Press `Delete` or `Backspace`
3. Or right-click and select "Delete Connection"
### Rearranging Flow
The flow diagram auto-layouts for clarity, but you can:
* **Zoom in/out** - Mouse wheel or zoom controls
* **Pan** - Click and drag empty space
* **Fit to view** - Button to see entire flow at once
* **Auto-layout** - Reorganize nodes automatically
## Frames
Frames are powerful tools for controlling how components repeat, randomize, or branch. Think of frames as containers that apply special logic to the components inside them.
### Loop Frames
Repeat a sequence of components multiple times.
**What they're for:**
* Practice trials (repeat 5 times)
* Experimental blocks (repeat 20 times)
* Multi-trial tasks (repeat 160 times)
* Any repeated sequence
**How to create:**
1. Select components to loop (click first, then Shift+click last)
2. Right-click → "Create Loop Frame"
3. Set repeat count (e.g., 20)
4. Components now enclosed in loop frame box
**Properties:**
* **Repeat count** - How many times to loop (1-1000)
* **Loop name** - Descriptive label (e.g., "Practice Block")
* **Iteration tracking** - Track which iteration participant is on
**Example:**
```
[Start Loop: 20 times]
→ Fixation (500ms)
→ Stimulus (2000ms)
→ Response (until keypress)
→ Feedback (1000ms)
[End Loop]
```
**Tip:** For different stimuli each iteration, use Variables view to define per-trial parameters instead of creating 20 separate components.
### Randomization Frames
Shuffle the order of components randomly.
**What they're for:**
* Randomized trial order
* Counterbalancing conditions
* Unpredictable sequences
* Preventing order effects
**How to create:**
1. Select components to randomize
2. Right-click → "Create Randomization Frame"
3. Components will appear in random order each time
**Properties:**
* **Randomization seed** - For reproducible randomization (optional)
* **Constraints** - Prevent certain orders (e.g., no more than 3 consecutive same type)
**Example:**
```
[Randomize these 3 components]
→ Condition A
→ Condition B
→ Condition C
[End Randomization]
Each participant sees different order: C→A→B or B→C→A, etc.
```
**Combining with loops:**
```
[Loop: 20 times]
[Randomize: 3 conditions]
→ Condition A
→ Condition B
→ Condition C
[End Randomize]
[End Loop]
Result: 60 total trials (20 of each condition), randomized order
```
### Per-Stimulus Frames
Link components to a set of stimuli for automatic trial generation.
**What they're for:**
* Image-based tasks (show each image from a set)
* Word lists (present each word once)
* Stimulus-driven experiments
* Simple variable substitution
**How to create:**
1. Upload stimuli to media library
2. Select component(s) to vary
3. Right-click → "Create Per-Stimulus Frame"
4. Select stimulus set from media library
5. Map stimuli to component elements
**Properties:**
* **Stimulus source** - Which media library folder
* **Stimulus count** - How many stimuli (auto-detected)
* **Randomize** - Shuffle stimulus order
* **Sampling** - Present subset of stimuli
**Example:**
```
[Per-Stimulus: 24 face images]
→ Fixation
→ Face Stimulus [pulls from stimulus set]
→ Response
[End Per-Stimulus]
Result: 24 trials, one for each face image
```
**Note:** For more complex trial variations (multiple parameters per trial), use the Variables view instead of Per-Stimulus frames.
### Conditional Frames
Branch to different components based on participant responses.
**What they're for:**
* Adaptive testing (adjust difficulty based on performance)
* Until-correct loops (repeat until participant answers correctly)
* Branching surveys (different questions based on previous answers)
* Personalized experiment paths
**How to create:**
1. Select components for conditional logic
2. Right-click → "Create Conditional Frame"
3. Choose condition type:
* **Until correct** - Repeat until correct response
* **Max attempts** - Limit number of tries
* **Custom condition** - Based on any variable
**Condition types:**
#### Until-Correct Loop
Repeat component until participant responds correctly.
**Properties:**
* **Max attempts** - Give up after N tries (prevents infinite loops)
* **Feedback** - Show why incorrect
* **Fallback** - What to do after max attempts reached
**Example:**
```
[Until Correct, max 3 attempts]
→ Question Component
→ Feedback (if incorrect)
[End Condition]
→ Next Component (after correct or max attempts)
```
#### Max Attempts Loop
Repeat up to N times regardless of correctness.
**Use case:** Limited practice trials
**Example:**
```
[Max 5 attempts]
→ Practice Trial
[End Condition]
→ Begin Main Experiment
```
#### Custom Condition
Branch based on any variable value.
**Example:**
```
If accuracy > 80%:
→ Hard Difficulty Block
Else:
→ Easy Difficulty Block
```
**Properties:**
* **Condition expression** - Variable comparisons
* **True path** - Components if condition met
* **False path** - Components if condition not met
## Frame Operations
### Creating Frames
1. **Select components:**
* Click first component
* Hold Shift and click last component (selects range)
* Or drag box around components
2. **Create frame:**
* Right-click selection
* Choose frame type from menu
3. **Configure frame:**
* Set properties in right panel
* Name frame descriptively
### Adding Components to Frames
**Add after creation:**
1. Drag component into frame boundary
2. Component becomes part of frame
3. Frame resizes to fit
**Add during creation:**
1. Create frame first (empty)
2. Add components inside frame boundary
3. Components auto-add to frame
### Removing Components from Frames
**Option 1: Remove one component**
* Drag component outside frame boundary
* Component disconnects from frame
**Option 2: Ungroup frame**
* Right-click frame → "Ungroup"
* Frame dissolves, components remain with connections
### Deleting Frames
To delete frame but keep components:
* Right-click frame → "Delete Frame"
* Components remain, frame logic removed
To delete frame AND components inside:
* Select frame
* Press Delete
* Confirm deletion
### Nested Frames
Frames can contain other frames for complex structures.
**Example: Nested Loops + Randomization**
```
[Loop: 5 blocks]
→ Block Instructions
[Loop: 10 trials per block]
[Randomize: 3 conditions]
→ Condition A
→ Condition B
→ Condition C
[End Randomize]
[End Loop]
→ Block Break
[End Loop]
Result: 5 blocks × 10 trials × 3 conditions (randomized within each block)
```
**Nested frame limit:** Up to 3 levels deep (prevents excessive complexity)
## Viewing and Navigation
### Zoom Controls
* **Zoom in** - Mouse wheel up or `+` button
* **Zoom out** - Mouse wheel down or `-` button
* **Fit to view** - Zoom to show all components
* **Zoom to selection** - Zoom to selected components
### Pan and Navigate
* **Pan** - Click and drag on empty space
* **Minimap** - Small overview in corner shows position in large flows
* **Jump to component** - Search and auto-pan to specific component
### Auto-Layout
Click "Auto-Layout" to reorganize flow diagram:
* **Horizontal layout** - Left to right flow (default)
* **Vertical layout** - Top to bottom flow
* **Hierarchical** - Shows nested frames clearly
* **Compact** - Minimize space between nodes
Auto-layout runs automatically when you add/remove components, but you can re-run manually if needed.
### Selecting Components
From the flow diagram:
1. Click component node
2. Right panel shows component properties
3. Edit properties without leaving Flow view
**Multi-select:**
* Hold Shift and click multiple nodes
* Or drag box around multiple nodes
* Apply frame or alignment to all
## Inter-Trial Fixation
Add fixation crosses or blank screens between trials automatically.
**What it's for:**
* Eye fixation point before stimulus
* Mental reset between trials
* Timing marker
* Standard cognitive neuroscience practice
**How to add:**
1. Select frame (e.g., loop frame)
2. Enable "Inter-trial fixation" in frame properties
3. Configure fixation settings
**Properties:**
* **Enabled** - Turn on/off
* **Duration** - How long fixation shows (typically 500-1000ms)
* **Symbol** - Choose: `+` (cross), `•` (dot), `×` (X)
* **Color** - Usually black or white depending on background
* **Size** - Font size of symbol
**Example:**
```
[Loop: 20 trials, inter-trial fixation: 500ms, +]
→ Stimulus
→ Response
[End Loop]
Actual flow:
Trial 1: Fixation (500ms) → Stimulus → Response
Trial 2: Fixation (500ms) → Stimulus → Response
... (repeat)
```
**Tip:** Inter-trial fixation is added *before* each iteration automatically. You don't need to create separate fixation components.
## Common Flow Patterns
### Linear Sequence
Simplest flow: components in order, no repeats.
**Use case:** Simple survey, single-trial experiment
**Structure:**
```
Intro → Consent → Instructions → Task → Debrief
```
**How to build:**
* Add components in Timeline view
* Auto-connects in sequence
* Verify in Flow view
### Randomized Trials
Shuffle trial order to prevent order effects.
**Use case:** Multi-condition experiments, counterbalancing
**Structure:**
```
Instructions → [Randomize: Condition A, B, C] → Debrief
```
**How to build:**
1. Add all trial components
2. Select trials to randomize
3. Create randomization frame
### Practice Trials Followed by Test Trials
Standard cognitive task structure.
**Structure:**
```
Instructions → Practice Trials (5 reps, feedback) → Begin Main Task → Test Trials (100 reps, no feedback)
```
**How to build:**
1. Create practice sequence with feedback
2. Add loop frame (5 reps)
3. Add transition instruction
4. Create test sequence without feedback
5. Add loop frame (100 reps)
### Conditional Branching Based on Performance
Adapt difficulty based on accuracy.
**Structure:**
```
Calibration Block →
If accuracy > 75%: Hard Block
Else: Easy Block
```
**How to build:**
1. Create calibration trials
2. Calculate accuracy
3. Add conditional frame
4. Define two paths (hard/easy)
5. Connect to appropriate block
### Multi-Block Experiment with Breaks
Long experiments need periodic breaks.
**Structure:**
```
[Loop: 5 blocks]
→ Block Instructions
→ [Loop: 40 trials] → Trial Sequence [End Loop]
→ Break Screen (30 sec rest)
[End Loop]
```
**How to build:**
1. Create single trial sequence
2. Add loop frame for trials per block (40)
3. Add break component after loop
4. Add block loop frame around entire structure (5 blocks)
### Blocked vs. Randomized Design
**Blocked design:** All trials of one condition, then all of another
```
[Block 1: Condition A, 50 trials] → [Block 2: Condition B, 50 trials]
```
**Randomized design:** Conditions intermixed
```
[Randomize and Loop: 100 trials of mixed A/B conditions]
```
**How to choose:**
* **Blocked:** When conditions require different instructions or setups
* **Randomized:** To prevent order effects and strategies
## Tips and Best Practices
### When to Use Frames vs. Timeline Variables
**Use Loop Frames when:**
* Simple repetition of same sequence
* You don't need per-trial parameter variation
* Less than \~10 trials
**Use Timeline Variables when:**
* Different stimuli/parameters each trial
* 20+ trials with systematic variation
* Need to import trial lists from CSV
* Complex trial structures
**Example:** For a 160-trial Stroop task, use Timeline Variables (not a 160-iteration loop frame).
### Organizing Complex Experiments
For experiments with many components:
1. **Name frames clearly** - "Practice Block", "Main Task", "Condition A Trials"
2. **Use Timeline folders** - Group components visually in Timeline view
3. **Collapse frames** - Hide frame contents in Flow view for overview
4. **Document flow** - Add text notes explaining branching logic
5. **Modular design** - Build and test each section separately
### Testing Your Flow Logic
Before sharing experiment:
1. **Trace paths** - Mentally walk through each possible participant path
2. **Check for dead ends** - Ensure all paths lead to experiment end
3. **Verify frame properties** - Loop counts, randomization settings correct
4. **Test conditionals** - Try all branches (high/low accuracy, different responses)
5. **Preview mode** - Run through experiment as participant
**Common flow errors to check:**
* Missing connections (component doesn't advance)
* Infinite loops (no exit condition)
* Unreachable components (no path leads to them)
* Wrong loop counts (10× instead of 100×)
### Performance Considerations
For very large experiments (200+ components):
* **Use variables instead of components** - 160 variable rows vs. 160 components
* **Minimize frame nesting** - Keep to 2-3 levels max
* **Simplify flow** - Reduce unnecessary branches
* **Test performance** - Preview with full trial count
### Frame Naming Conventions
Use clear, descriptive names:
**Good names:**
* "Practice Trials (5 reps)"
* "Main Task Block 1"
* "Randomized Conditions A/B/C"
* "Until Correct (max 3 attempts)"
**Poor names:**
* "Loop 1"
* "Frame"
* "Randomize"
* "Test"
## Flow View Limitations
**What Flow view CAN'T do:**
* Edit component content (use Screens view)
* Configure timing (use Timeline view)
* Define trial variables (use Variables view)
* Run experiment (use Preview)
**Flow view is for structure only** - it visualizes and controls how components connect, but not what's inside each component.
***
## Next Steps
Now that you understand the Flow view, explore other views:
Design component content and layout
Control timing and trial organization
Define trial-by-trial parameter variation
Test your experiment flow
The Flow view gives you complete control over your experiment's structure. Create sophisticated experimental designs with loops, randomization, and branching - all visualized in an intuitive flowchart.