> ## Documentation Index
> Fetch the complete documentation index at: https://docs.assesskit.com/llms.txt
> Use this file to discover all available pages before exploring further.
# Sharing
> Publish experiments and collect data from participants
 # Sharing
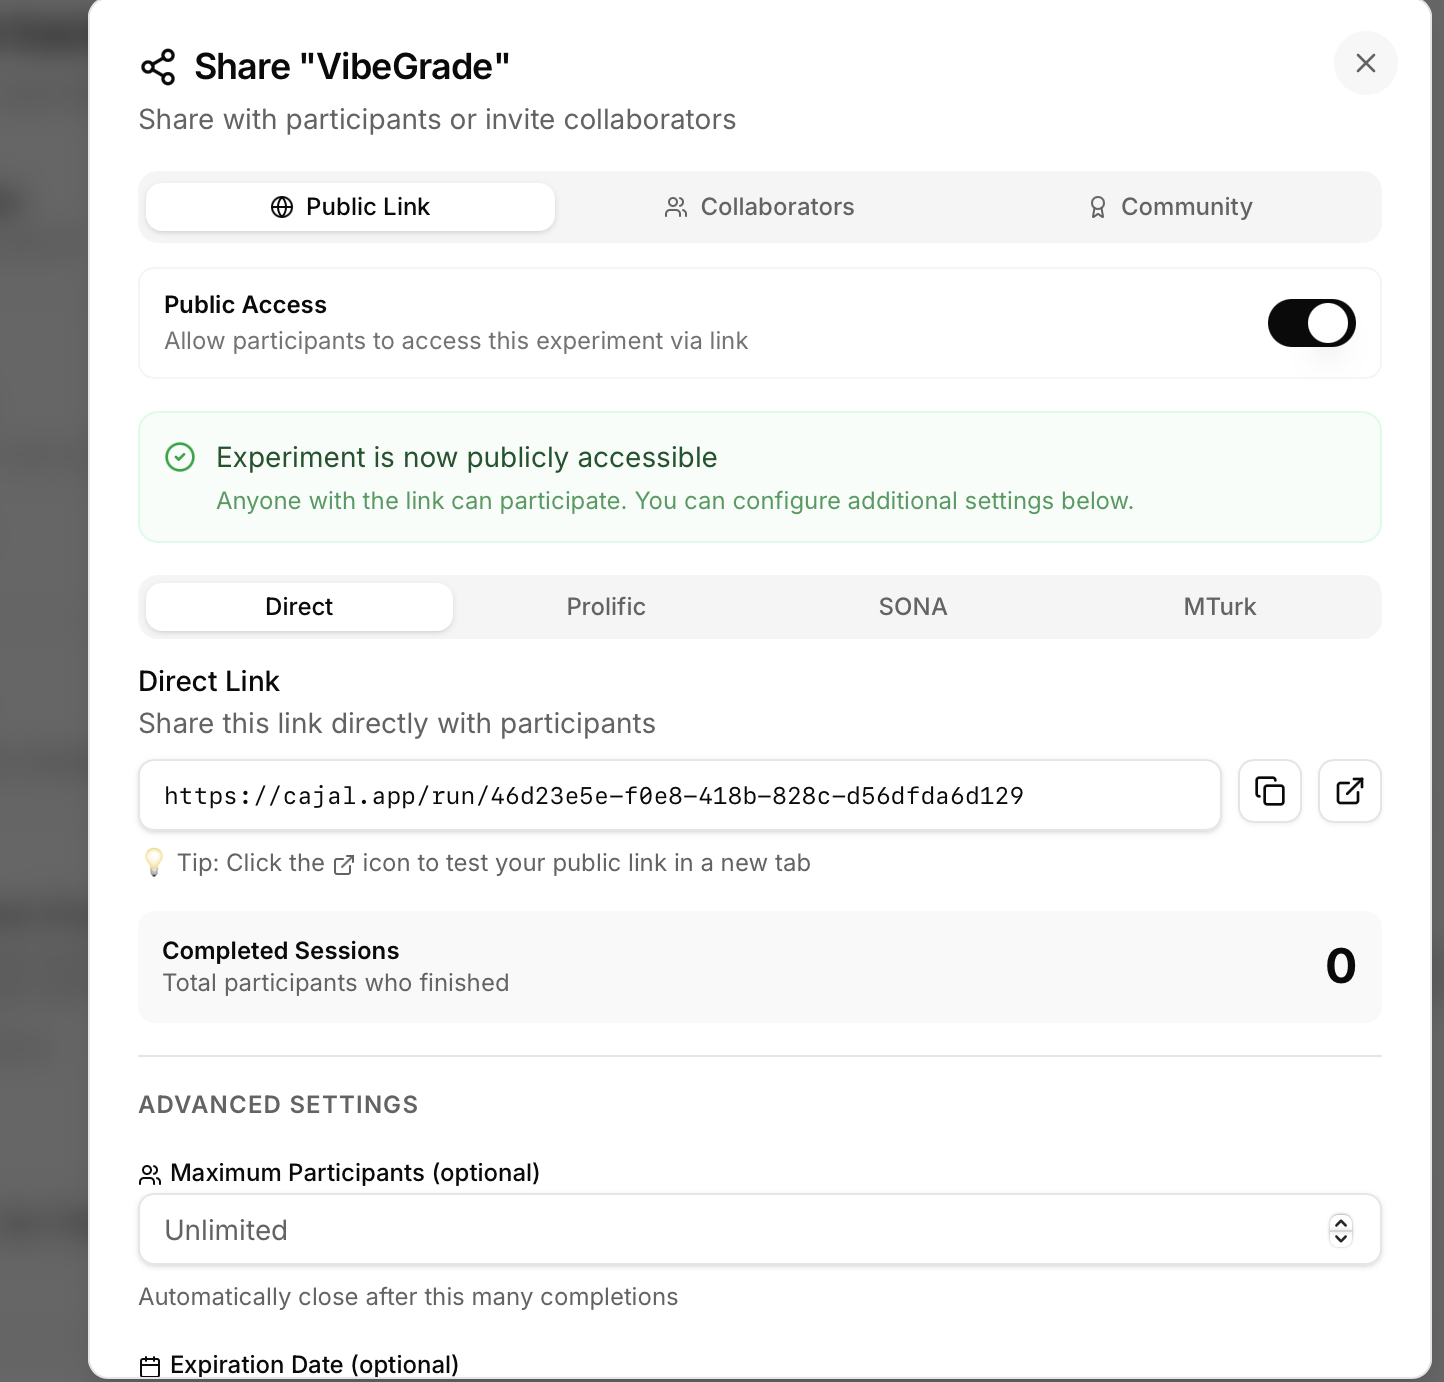
Share your experiments in two ways: **collect data from participants** with public links, or **collaborate with team members** who can help build and refine your experiment. The Share dialog provides everything you need to distribute experiments and manage access.
## Overview
Sharing enables:
**For data collection:**
* Generate public links for participant recruitment
* Integrate with Prolific, MTurk, SONA
* Set participant limits and expiration dates
* Monitor completion statistics in real-time
* Prevent duplicate responses
* Generate completion codes
**For collaboration:**
* Invite team members by email
* Set permission levels (Viewer, Editor, Owner)
* Work together in real-time
* Manage pending invitations
* Control who can edit experiment
**When to share:**
* Ready to collect real participant data
* Need collaborator feedback or help
* Publishing to community repository
* Testing with colleagues before full launch
## Share Dialog
### Where to Find
**Open share dialog:**
1. In experiment, click **Share** button in top toolbar
2. Or use keyboard shortcut (if configured)
3. Share dialog opens with three tabs
**Three main tabs:**
* **Public Link** - For participant data collection
* **Collaborators** - For team access
* **Community** - For public repository submission
***
## Tab 1: Public Link (Participant Sharing)
Collect data from participants with publicly accessible links.
### Making Experiment Public
**Publish your experiment:**
1. Open Share dialog
2. Go to "Public Link" tab
3. Toggle **"Make Public"** switch to ON
4. Experiment validates automatically
5. If validation passes, publish button activates
6. Click **"Publish"**
7. Public link generates
8. Experiment now accessible via link
**What happens when published:**
* Experiment frozen (edits create new version)
* Unique share link created
* Participant data collection enabled
* Real-time monitoring active
**Note:** You can still edit after publishing, but edits don't affect the published version until you re-publish.
### Share Links
Once published, you get links formatted for different platforms.
#### Direct Link
**Universal sharing link** for any recruitment method.
**Format:**
```
https://assesskit.com/run/[experiment-id]
```
**Use for:**
* Email recruitment
* Social media posts (Twitter, Reddit)
* QR codes for in-person recruitment
* Direct messaging to participants
* Embedding in websites
**How to use:**
1. Copy link from Share dialog
2. Send to participants directly
3. Participants click and run experiment
4. Data automatically recorded
#### Prolific Integration
**Complete workflow for Prolific studies:**
**Step 1: Publish in Cajal**
1. Toggle "Make Public"
2. Click "Publish"
3. Copy **Prolific link** (special format)
**Step 2: Create Study in Prolific**
1. Log into Prolific
2. Click "New Study"
3. Fill in study details (title, description, etc.)
4. Set sample size and payment
**Step 3: Connect Cajal Link**
1. Under "Study link", select "I'll use my own link"
2. Paste Cajal Prolific link
3. Prolific format: `https://assesskit.com/run/[id]?PROLIFIC_PID={{%PROLIFIC_PID%}}`
**Step 4: Set Completion URL**
1. Enable "I'll redirect them at the end"
2. Cajal automatically redirects to Prolific completion
3. Or set custom redirect in Cajal settings
**Step 5: Publish Study**
1. Review and publish in Prolific
2. Participants see Cajal experiment
3. Upon completion, redirect to Prolific
4. Payment processed automatically
**Participant ID Capture:**
* PROLIFIC\_PID captured automatically from URL
* Stored with participant data
* Links Cajal data to Prolific submissions
* Enables payment verification
**Completion Code Setup:**
* Cajal shows completion code at end
* Participant enters in Prolific
* Verifies completion
* Or use automatic redirect (no code needed)
#### MTurk (Amazon Mechanical Turk)
**Workflow for MTurk HIT:**
**Step 1: Get MTurk Link**
1. Publish experiment in Cajal
2. Copy **MTurk link** from Share dialog
3. Format: `https://assesskit.com/run/[id]?workerId=${workerId}`
**Step 2: Create HIT in MTurk**
1. Log into MTurk Requester
2. Create new HIT
3. Choose "Survey Link" project type
**Step 3: Configure HIT**
1. Paste Cajal MTurk link as survey URL
2. Set reward amount
3. Set number of assignments (participants)
4. Set time limit and expiration
**Step 4: Worker ID Capture**
1. workerId captured from URL automatically
2. Stored with data for payment verification
**Step 5: Completion Codes**
1. Cajal shows completion code
2. Worker enters code in MTurk to submit
3. Verify code matches for payment approval
#### SONA (Psychology Participant Pool)
**Workflow for SONA credits:**
**Step 1: Get SONA Link**
1. Publish in Cajal
2. Copy **SONA link**
3. Format: `https://assesskit.com/run/[id]?survey_code=%SURVEY_CODE%`
**Step 2: Create Study in SONA**
1. Log into SONA system
2. Add new study
3. Select "Study URL" for online studies
**Step 3: Configure Study**
1. Paste Cajal SONA link
2. Set credit amount
3. Set participant eligibility
**Step 4: Credit Granting**
1. Participants click from SONA
2. survey\_code captured automatically
3. Upon completion, redirect to SONA
4. Credits granted automatically
**Note:** Setup varies by institution's SONA configuration. Check with SONA administrator for specific redirect URLs.
### QR Codes
Share experiments for mobile or in-person recruitment.
**QR code generation:**
1. Publish experiment
2. Share dialog shows QR code automatically
3. Click to view full-size QR code
4. Download or print QR code
**Use cases:**
* Post on flyers for in-person recruitment
* Display in lab waiting area
* Include in presentations
* Share via messaging apps
* Quick mobile access
**How participants use:**
1. Scan QR code with smartphone camera
2. Opens experiment in mobile browser
3. Complete experiment on phone
4. Data collected same as desktop
**Tip:** Test QR code and experiment on mobile devices before distributing.
### Advanced Settings
Fine-tune data collection parameters.
#### Participant Limits
**Maximum completions** - Stop accepting participants after N completions.
**Settings:**
* Unlimited (default)
* Or set specific number (e.g., 100 participants)
**Why use limits:**
* Funded studies with fixed sample size (e.g., "Recruit 50 participants")
* Prevent over-recruitment
* Budget control (if paying participants)
* Power analysis determined N needed
**What happens when limit reached:**
* Link still works but shows "Study full" message
* No more data collected
* You're notified via email (if configured)
**How to set:**
1. Public Link tab → Advanced Settings
2. Enable "Maximum participants"
3. Enter number (e.g., 100)
4. Save settings
#### Expiration Dates
**Auto-close recruitment** after specific date/time.
**Settings:**
* No expiration (default)
* Or set date and time (e.g., "December 31, 2024 11:59 PM")
**Why use expiration:**
* Time-limited studies (e.g., "Recruiting through end of semester")
* Conference deadline data collection
* Longitudinal study waves (specific time windows)
* Prevent stale links from collecting invalid data
**What happens after expiration:**
* Link shows "Study closed" message
* No new participants can start
* Participants who started before expiration can finish
* You can extend expiration if needed
**How to set:**
1. Advanced Settings → "Expiration date"
2. Select date and time
3. Save settings
#### Data Collection Options
**Email collection:**
* **Disabled** - No email collected (default)
* **Optional** - Participant can provide email
* **Required** - Must provide email to participate
**Use cases for email:**
* Longitudinal studies (recontact participants)
* Sending results or compensation
* Deduplication (prevent same person multiple times)
* Follow-up studies
**Name collection:**
* Same options: Disabled, Optional, Required
* Collect participant names for records
* Usually optional unless required by IRB
**Privacy considerations:**
* Only collect what's necessary for research
* Check IRB requirements
* Provide privacy notice
* Store securely
#### Deduplication
**Prevent duplicate responses** from same participant.
**Deduplication methods:**
**1. IP Address Tracking**
* Same IP address blocked from repeating
* Simple, automatic
* Limitation: Shared IPs (libraries, households) blocked together
**2. Browser Fingerprinting**
* Identifies browser configuration
* More precise than IP
* Works across network changes
* Harder to circumvent
**3. Participant ID Matching**
* Uses Prolific PID, MTurk Worker ID, or email
* Most reliable for platform recruitment
* Requires participant identifier
**Settings:**
* **None** - Allow repeats (not recommended for most studies)
* **IP only** - Prevent same IP
* **Browser fingerprint** - Prevent same browser
* **Strict** - IP + fingerprint + ID
**Cooldown period:**
* Allow re-participation after N days
* Example: "No repeat for 30 days"
* Useful for longitudinal designs
**How to configure:**
1. Advanced Settings → "Deduplication"
2. Choose method
3. Set cooldown (if applicable)
4. Save
### Monitoring Progress
Track recruitment and completion in real-time.
**Real-time statistics:**
* **Total participants** - How many started
* **Completed** - How many finished
* **In progress** - Currently active sessions
* **Completion rate** - Percentage who finished
* **Average time** - How long to complete
* **Dropout rate** - Percentage who abandoned
**View statistics:**
1. Share dialog → Public Link tab
2. "Statistics" section shows counts
3. Click "View Details" for breakdown
4. Real-time updates (refresh every 30 seconds)
**Use statistics to:**
* Monitor recruitment pace
* Estimate time to target N
* Identify technical issues (high dropout)
* Adjust recruitment if needed
### Validation Before Publishing
**Cajal checks experiment before publishing:**
**What gets validated:**
* All components have valid properties
* No broken image links
* All text elements have content
* Response components have valid keys configured
* Timeline structure makes sense
* No missing required fields
**Validation outcomes:**
**Pass (Green):**
* "Ready to publish"
* No issues found
* Publish button enabled
**Warnings (Yellow):**
* "Recommended fixes but can publish"
* Examples: No practice trials, long experiment, no breaks
* You can still publish, but consider fixes
**Errors (Red):**
* "Must fix before publishing"
* Examples: Missing images, invalid response keys, broken flow
* Publish button disabled
* Fix errors then retry
**Common validation warnings:**
* "Experiment over 20 minutes - consider adding breaks"
* "No practice trials - participants may be confused"
* "Instructions don't explain response keys"
* "No consent form - check IRB requirements"
**How to fix:**
1. Review warnings/errors
2. Click error to jump to problematic component
3. Fix issue
4. Re-validate (automatic)
5. Publish when validation passes
***
## Tab 2: Collaborators (Team Sharing)
Invite team members to help build and refine experiments.
### Adding Collaborators
**Invite collaborators by email:**
**Steps:**
1. Share dialog → Collaborators tab
2. Enter collaborator email address
3. Select permission level (Viewer or Editor)
4. Click "Send Invitation"
5. Invitation sent to email
6. Collaborator appears in "Pending Invitations"
**What collaborator receives:**
* Email invitation with link
* Explanation of permission level
* "Accept" or "Decline" options
* Link to experiment (after accepting)
**After acceptance:**
* Collaborator added to "Active Collaborators" list
* Can access experiment based on permissions
* Receives notifications of changes (if enabled)
### Permission Levels
Three permission levels control what collaborators can do.
**Permission comparison:**
| Action | Viewer | Editor | Owner |
| --------------------- | ------ | ------ | ----- |
| View experiment | ✓ | ✓ | ✓ |
| Preview experiment | ✓ | ✓ | ✓ |
| Edit components | ✗ | ✓ | ✓ |
| Add/delete components | ✗ | ✓ | ✓ |
| Change settings | ✗ | ✓ | ✓ |
| Publish experiment | ✗ | ✓ | ✓ |
| Invite collaborators | ✗ | ✗ | ✓ |
| Change permissions | ✗ | ✗ | ✓ |
| Delete experiment | ✗ | ✗ | ✓ |
| Transfer ownership | ✗ | ✗ | ✓ |
**Viewer:**
* Read-only access
* Can view and preview
* Cannot make changes
* Good for: Stakeholders, advisors reviewing work
**Editor:**
* Full editing access
* Can build and modify experiment
* Can publish changes
* Cannot manage team or delete experiment
* Good for: Co-authors, research assistants, team members
**Owner:**
* Full control
* Only one owner per experiment
* Can transfer ownership to someone else
* Can delete experiment
* Good for: Primary investigator, lab manager
### Managing Collaborators
**View active collaborators:**
* Share dialog → Collaborators tab
* "Active Collaborators" section
* Shows: Name, email, permission level, date added
**Change permissions:**
1. Find collaborator in list
2. Click permission dropdown
3. Select new level (Viewer or Editor)
4. Save changes
5. Collaborator notified of permission change
**Remove collaborators:**
1. Find collaborator in list
2. Click "Remove" button
3. Confirm removal
4. Collaborator loses access immediately
5. Notified via email of removal
**Transfer ownership:**
1. Must be current owner
2. Select new owner from collaborators (must be Editor first)
3. Confirm transfer
4. You become Editor, they become Owner
5. Cannot be undone (new owner must transfer back)
### Pending Invitations
**View pending invitations:**
* "Pending Invitations" section
* Shows: Email, permission level, sent date, status
**Pending invitation actions:**
**Resend invitation:**
* Collaborator didn't receive or lost email
* Click "Resend"
* New email sent with invitation link
**Revoke invitation:**
* Changed mind about inviting
* Click "Revoke"
* Invitation cancelled
* If they click link, shows "Invitation expired"
**Expiration:**
* Invitations expire after 7 days
* Must resend if expired
* Prevents stale invitations
### Real-Time Collaboration
**When multiple people edit:**
* See who else is viewing/editing
* Presence indicators show active collaborators
* Changes sync automatically
* No explicit "save" needed - auto-saves
**Conflict handling:**
* If two people edit same component simultaneously
* Last save wins (later timestamp)
* System alerts you if your changes were overwritten
* Can view change history to recover
**Best practices:**
* Communicate with team about who's editing what
* Use comments or notes to coordinate
* Don't edit same components simultaneously
* Review changes in version history if conflicts occur
***
## Tab 3: Community (Public Repository)
Submit your experiment to Cajal's public repository for others to use.
### Submitting to Community
**What is the community repository:**
* Public collection of experiments
* Shared by researchers
* Discoverable by psychology community
* Template library for others to use
**Why submit:**
* Share validated paradigms
* Contribute to open science
* Increase citations (link to your paper)
* Help other researchers
**How to submit:**
1. Share dialog → Community tab
2. Click "Submit to Community"
3. Fill in required and optional information
4. Submit for moderator review
5. Wait for approval (typically 1-2 weeks)
6. Experiment appears in public repository if approved
### Required Information
**Must provide:**
**1. Experiment Title**
* Clear, descriptive title
* Include paradigm name if applicable
* Example: "Classic Stroop Task (160 trials)"
**2. Category**
* Select primary category:
* Cognitive Psychology
* Perception
* Memory
* Attention
* Social Psychology
* Clinical Psychology
* Developmental
* Neuroscience
* Surveys/Questionnaires
* Other
**3. Description**
* Brief description of experiment (500 char limit)
* What does it measure?
* Key features
* Example: "Classic Stroop color-word interference task with 160 trials (80 congruent, 80 incongruent). Includes practice trials and automatic scoring."
### Optional Information
**Recommended to provide:**
**Research Area (Subcategory):**
* More specific than main category
* Examples:
* Working Memory
* Selective Attention
* Facial Recognition
* Moral Judgment
* Anxiety Disorders
**Paper DOI or URL:**
* Link to published paper using this paradigm
* DOI format: `10.1037/xxxxx`
* Or URL to preprint/paper
**Citation (APA format):**
* Full reference for your paper
* Proper APA 7th edition formatting
* Example: "Smith, J., & Doe, A. (2024). Title of paper. Journal Name, 10(2), 123-145. [https://doi.org/10.xxxx](https://doi.org/10.xxxx)"
**Tags:**
* Up to 5 keywords
* Lowercase, comma-separated
* Examples: "stroop, interference, attention, reaction time, cognitive control"
* Helps discoverability
### Approval Process
**Moderator review:**
**What moderators check:**
1. **Technical validity** - Experiment works correctly
2. **Scientific quality** - Appropriate methodology
3. **Completeness** - Instructions clear, all components present
4. **Compliance** - Follows community guidelines
5. **Appropriate content** - No harmful or unethical studies
**Review timeline:**
* Submission received notification
* Review within 1-2 weeks
* Approval/rejection email
* If rejected, reason provided with option to resubmit
**Approval criteria:**
* Experiment runs without errors
* Clear instructions for participants
* Standard or well-validated paradigm
* Ethical and appropriate for public use
* Proper attribution (citations if replicating published work)
**After approval:**
* Experiment appears in Community Repository
* Public can view, duplicate, and use
* You maintain ownership of original
* Can update anytime (requires re-approval for changes)
### After Approval
**Community experiment benefits:**
**Public visibility:**
* Appears in searchable repository
* Discoverable by keyword, category, tags
* Increases reach and impact
**Usage statistics:**
* View count - How many people viewed your experiment
* Duplicate count - How many people copied it
* Like/favorite count - Community interest metric
**Recognition:**
* Citation tracking (if paper linked)
* Attribution shown to all users
* Your research visible to global community
**Maintenance:**
* You can update approved experiments
* Updates require re-approval
* Original submission always available
* Version history maintained
***
## Testing Your Shared Experiment
**Before distributing to real participants:**
### Test in New Tab
**"Test in New Tab" button:**
1. Share dialog → Public Link tab
2. Click "Test in New Tab"
3. Opens experiment in participant view
4. New browser tab, simulates real participant
5. Complete experiment as participant would
**What to check:**
* Link loads correctly
* All images display
* Instructions clear
* Response collection works
* Timing feels appropriate
* Completion code appears (if used)
### Test on Different Devices
**Devices to test:**
* **Desktop browser** - Chrome, Firefox, Safari
* **Mobile phone** - If participants will use mobile
* **Tablet** - If applicable
* **Different screen sizes** - Ensure responsive
**What can go wrong:**
* Images too large for mobile screen
* Text too small to read
* Buttons too small to tap
* Layout breaks on narrow screens
**Fix before distributing:**
* Adjust responsive settings
* Test on actual devices
* Get feedback from colleague on different device
### Test with Colleague
**Naive user test:**
1. Send link to colleague unfamiliar with experiment
2. Ask them to complete without explanation
3. Don't guide or answer questions
4. Note what confuses them
5. Fix unclear instructions or issues
6. Retest until smooth experience
**What to ask after:**
* Were instructions clear?
* Any confusing parts?
* Any technical issues?
* How long did it take?
* Any suggestions?
***
## Completion Codes
Verify participant completion for paid studies.
### Configuring Completion Codes
**Settings:**
1. Share dialog → Public Link tab
2. Advanced Settings → "Completion Code"
3. Choose code format
**Code format options:**
* **Random** - Random alphanumeric string (e.g., "X7K9P2")
* **Sequential** - Sequential numbers (e.g., "CAJAL-0001", "CAJAL-0002")
* **Custom template** - Define your own pattern with variables
**Custom template variables:**
* `{sessionId}` - Unique session identifier
* `{random}` - Random string
* `{timestamp}` - Completion time
* `{participantId}` - If collected
**Example custom:**
```
Template: "CAJAL-{sessionId}-{random}"
Generates: "CAJAL-abc123-X7K9"
```
### Showing Codes to Participants
**Automatic display:**
* Completion code shown at end of experiment
* Full-screen display
* Instructions: "Copy this code and paste into \[platform]"
* Button to copy code to clipboard
**What participants do:**
1. Complete experiment
2. See completion code
3. Copy code (click copy button or select text)
4. Return to Prolific/MTurk/etc.
5. Paste code to verify completion
6. Submit for payment
### Verifying Completion
**Platform-specific verification:**
**Prolific:**
* Participant enters code in Prolific
* You review and approve submissions
* Match code to Cajal data using PROLIFIC\_PID
* Approve payments
**MTurk:**
* Worker enters code to submit HIT
* You check code validity
* Approve payments for valid codes
**Manual verification:**
1. Export data from Cajal
2. Column shows completion codes
3. Match participant submissions to codes
4. Verify completion before payment
**Tip:** Use automatic redirect instead of manual codes when possible (less error-prone).
***
## Settings Reference
Quick reference for all sharing settings.
| Setting | What It Does | When to Use | Options |
| -------------------- | ------------------------------------ | -------------------------- | -------------------------- |
| **Public Access** | Makes experiment accessible via link | Always for data collection | ON/OFF |
| **Max Participants** | Limits total completions | Fixed sample size studies | Number or Unlimited |
| **Expiration Date** | Auto-closes recruitment | Time-limited studies | Date/time or Never |
| **Email Collection** | Collects participant emails | Longitudinal, recontact | Disabled/Optional/Required |
| **Name Collection** | Collects participant names | IRB requirements | Disabled/Optional/Required |
| **Deduplication** | Prevents repeat participation | Most studies | None/IP/Fingerprint/Strict |
| **Cooldown Period** | Time before re-participation | Longitudinal designs | Days |
| **Consent Form** | Custom consent text | IRB compliance | Custom text |
| **Completion Code** | Verification code | Platform payments | Random/Sequential/Custom |
***
## Troubleshooting
### Common Issues
**Link Not Working**
**Symptom:** Participants can't access experiment
**Causes:**
* Experiment not published (still draft)
* Public access toggled OFF
* Link expired (expiration date passed)
* Max participants reached
**Solutions:**
1. Check experiment status (must be "Published")
2. Verify "Make Public" toggle is ON
3. Check expiration date hasn't passed
4. Check participant limit not reached
5. Re-publish if needed
**Participants Can't Complete**
**Symptom:** Participants start but can't finish
**Causes:**
* Validation errors in experiment
* Missing required form fields
* Broken image links
* Response keys not configured
* Browser compatibility issues
**Solutions:**
1. Preview entire experiment yourself
2. Check for validation warnings
3. Test on different browsers
4. Fix missing/broken content
5. Re-publish after fixes
**Data Not Collecting**
**Symptom:** Participant completes but no data in database
**Causes:**
* Components missing response configuration
* Database connection issues (rare)
* Participant closed browser early
* Network issues during submission
**Solutions:**
1. Verify all response components have response configuration
2. Check data export - may be collecting but not visible in interface
3. Test data collection with preview mode
4. Check that "Save responses" is enabled for components
**Too Many Participants**
**Symptom:** Over-recruited, too much data
**Prevention:**
* Set max participants limit beforehand
* Monitor progress regularly
* Close recruitment when approaching target
**If already happened:**
* Use first N participants
* Or randomly sample from full dataset
* Document in methods
**Duplicate Responses**
**Symptom:** Same person completed multiple times
**Prevention:**
* Enable deduplication before launching
* Use strict method (IP + fingerprint + ID)
**If already happened:**
* Check for duplicate IDs (Prolific PID, email, etc.)
* Remove duplicates in analysis
* Keep first or last submission (document choice)
***
## Best Practices
### Before Sharing
**Pre-flight checklist:**
* [ ] Preview entire experiment
* [ ] Test on target devices
* [ ] Colleague review (naive user)
* [ ] Validate before publishing
* [ ] Set appropriate participant limit
* [ ] Configure expiration date if needed
* [ ] Enable deduplication
* [ ] Test platform integration (Prolific link works)
### During Data Collection
**Monitor regularly:**
* Check completion rate
* Watch for high dropout (indicates problem)
* Review first few participants' data
* Respond to participant questions promptly
* Adjust recruitment if needed
**Don't:**
* Make major changes to published experiment
* Change settings mid-recruitment (creates inconsistency)
* Ignore dropout patterns
### After Data Collection
**Close recruitment:**
* Toggle "Make Public" OFF when target reached
* Or set expiration date
* Prevents accidental additional data
**Data management:**
* Export data immediately
* Back up raw data
* Document any exclusions
* Store securely per IRB requirements
***
## Next Steps
Now that you understand sharing:
Test before sharing with participants
Build or refine your experiment
Configure trial variations
Get help improving your experiment
Sharing connects your experiments to participants and collaborators. Whether collecting data from hundreds of participants or collaborating with team members, the Share dialog provides all the tools you need for successful psychology research.
# Sharing
Share your experiments in two ways: **collect data from participants** with public links, or **collaborate with team members** who can help build and refine your experiment. The Share dialog provides everything you need to distribute experiments and manage access.
## Overview
Sharing enables:
**For data collection:**
* Generate public links for participant recruitment
* Integrate with Prolific, MTurk, SONA
* Set participant limits and expiration dates
* Monitor completion statistics in real-time
* Prevent duplicate responses
* Generate completion codes
**For collaboration:**
* Invite team members by email
* Set permission levels (Viewer, Editor, Owner)
* Work together in real-time
* Manage pending invitations
* Control who can edit experiment
**When to share:**
* Ready to collect real participant data
* Need collaborator feedback or help
* Publishing to community repository
* Testing with colleagues before full launch
## Share Dialog
### Where to Find
**Open share dialog:**
1. In experiment, click **Share** button in top toolbar
2. Or use keyboard shortcut (if configured)
3. Share dialog opens with three tabs
**Three main tabs:**
* **Public Link** - For participant data collection
* **Collaborators** - For team access
* **Community** - For public repository submission
***
## Tab 1: Public Link (Participant Sharing)
Collect data from participants with publicly accessible links.
### Making Experiment Public
**Publish your experiment:**
1. Open Share dialog
2. Go to "Public Link" tab
3. Toggle **"Make Public"** switch to ON
4. Experiment validates automatically
5. If validation passes, publish button activates
6. Click **"Publish"**
7. Public link generates
8. Experiment now accessible via link
**What happens when published:**
* Experiment frozen (edits create new version)
* Unique share link created
* Participant data collection enabled
* Real-time monitoring active
**Note:** You can still edit after publishing, but edits don't affect the published version until you re-publish.
### Share Links
Once published, you get links formatted for different platforms.
#### Direct Link
**Universal sharing link** for any recruitment method.
**Format:**
```
https://assesskit.com/run/[experiment-id]
```
**Use for:**
* Email recruitment
* Social media posts (Twitter, Reddit)
* QR codes for in-person recruitment
* Direct messaging to participants
* Embedding in websites
**How to use:**
1. Copy link from Share dialog
2. Send to participants directly
3. Participants click and run experiment
4. Data automatically recorded
#### Prolific Integration
**Complete workflow for Prolific studies:**
**Step 1: Publish in Cajal**
1. Toggle "Make Public"
2. Click "Publish"
3. Copy **Prolific link** (special format)
**Step 2: Create Study in Prolific**
1. Log into Prolific
2. Click "New Study"
3. Fill in study details (title, description, etc.)
4. Set sample size and payment
**Step 3: Connect Cajal Link**
1. Under "Study link", select "I'll use my own link"
2. Paste Cajal Prolific link
3. Prolific format: `https://assesskit.com/run/[id]?PROLIFIC_PID={{%PROLIFIC_PID%}}`
**Step 4: Set Completion URL**
1. Enable "I'll redirect them at the end"
2. Cajal automatically redirects to Prolific completion
3. Or set custom redirect in Cajal settings
**Step 5: Publish Study**
1. Review and publish in Prolific
2. Participants see Cajal experiment
3. Upon completion, redirect to Prolific
4. Payment processed automatically
**Participant ID Capture:**
* PROLIFIC\_PID captured automatically from URL
* Stored with participant data
* Links Cajal data to Prolific submissions
* Enables payment verification
**Completion Code Setup:**
* Cajal shows completion code at end
* Participant enters in Prolific
* Verifies completion
* Or use automatic redirect (no code needed)
#### MTurk (Amazon Mechanical Turk)
**Workflow for MTurk HIT:**
**Step 1: Get MTurk Link**
1. Publish experiment in Cajal
2. Copy **MTurk link** from Share dialog
3. Format: `https://assesskit.com/run/[id]?workerId=${workerId}`
**Step 2: Create HIT in MTurk**
1. Log into MTurk Requester
2. Create new HIT
3. Choose "Survey Link" project type
**Step 3: Configure HIT**
1. Paste Cajal MTurk link as survey URL
2. Set reward amount
3. Set number of assignments (participants)
4. Set time limit and expiration
**Step 4: Worker ID Capture**
1. workerId captured from URL automatically
2. Stored with data for payment verification
**Step 5: Completion Codes**
1. Cajal shows completion code
2. Worker enters code in MTurk to submit
3. Verify code matches for payment approval
#### SONA (Psychology Participant Pool)
**Workflow for SONA credits:**
**Step 1: Get SONA Link**
1. Publish in Cajal
2. Copy **SONA link**
3. Format: `https://assesskit.com/run/[id]?survey_code=%SURVEY_CODE%`
**Step 2: Create Study in SONA**
1. Log into SONA system
2. Add new study
3. Select "Study URL" for online studies
**Step 3: Configure Study**
1. Paste Cajal SONA link
2. Set credit amount
3. Set participant eligibility
**Step 4: Credit Granting**
1. Participants click from SONA
2. survey\_code captured automatically
3. Upon completion, redirect to SONA
4. Credits granted automatically
**Note:** Setup varies by institution's SONA configuration. Check with SONA administrator for specific redirect URLs.
### QR Codes
Share experiments for mobile or in-person recruitment.
**QR code generation:**
1. Publish experiment
2. Share dialog shows QR code automatically
3. Click to view full-size QR code
4. Download or print QR code
**Use cases:**
* Post on flyers for in-person recruitment
* Display in lab waiting area
* Include in presentations
* Share via messaging apps
* Quick mobile access
**How participants use:**
1. Scan QR code with smartphone camera
2. Opens experiment in mobile browser
3. Complete experiment on phone
4. Data collected same as desktop
**Tip:** Test QR code and experiment on mobile devices before distributing.
### Advanced Settings
Fine-tune data collection parameters.
#### Participant Limits
**Maximum completions** - Stop accepting participants after N completions.
**Settings:**
* Unlimited (default)
* Or set specific number (e.g., 100 participants)
**Why use limits:**
* Funded studies with fixed sample size (e.g., "Recruit 50 participants")
* Prevent over-recruitment
* Budget control (if paying participants)
* Power analysis determined N needed
**What happens when limit reached:**
* Link still works but shows "Study full" message
* No more data collected
* You're notified via email (if configured)
**How to set:**
1. Public Link tab → Advanced Settings
2. Enable "Maximum participants"
3. Enter number (e.g., 100)
4. Save settings
#### Expiration Dates
**Auto-close recruitment** after specific date/time.
**Settings:**
* No expiration (default)
* Or set date and time (e.g., "December 31, 2024 11:59 PM")
**Why use expiration:**
* Time-limited studies (e.g., "Recruiting through end of semester")
* Conference deadline data collection
* Longitudinal study waves (specific time windows)
* Prevent stale links from collecting invalid data
**What happens after expiration:**
* Link shows "Study closed" message
* No new participants can start
* Participants who started before expiration can finish
* You can extend expiration if needed
**How to set:**
1. Advanced Settings → "Expiration date"
2. Select date and time
3. Save settings
#### Data Collection Options
**Email collection:**
* **Disabled** - No email collected (default)
* **Optional** - Participant can provide email
* **Required** - Must provide email to participate
**Use cases for email:**
* Longitudinal studies (recontact participants)
* Sending results or compensation
* Deduplication (prevent same person multiple times)
* Follow-up studies
**Name collection:**
* Same options: Disabled, Optional, Required
* Collect participant names for records
* Usually optional unless required by IRB
**Privacy considerations:**
* Only collect what's necessary for research
* Check IRB requirements
* Provide privacy notice
* Store securely
#### Deduplication
**Prevent duplicate responses** from same participant.
**Deduplication methods:**
**1. IP Address Tracking**
* Same IP address blocked from repeating
* Simple, automatic
* Limitation: Shared IPs (libraries, households) blocked together
**2. Browser Fingerprinting**
* Identifies browser configuration
* More precise than IP
* Works across network changes
* Harder to circumvent
**3. Participant ID Matching**
* Uses Prolific PID, MTurk Worker ID, or email
* Most reliable for platform recruitment
* Requires participant identifier
**Settings:**
* **None** - Allow repeats (not recommended for most studies)
* **IP only** - Prevent same IP
* **Browser fingerprint** - Prevent same browser
* **Strict** - IP + fingerprint + ID
**Cooldown period:**
* Allow re-participation after N days
* Example: "No repeat for 30 days"
* Useful for longitudinal designs
**How to configure:**
1. Advanced Settings → "Deduplication"
2. Choose method
3. Set cooldown (if applicable)
4. Save
### Monitoring Progress
Track recruitment and completion in real-time.
**Real-time statistics:**
* **Total participants** - How many started
* **Completed** - How many finished
* **In progress** - Currently active sessions
* **Completion rate** - Percentage who finished
* **Average time** - How long to complete
* **Dropout rate** - Percentage who abandoned
**View statistics:**
1. Share dialog → Public Link tab
2. "Statistics" section shows counts
3. Click "View Details" for breakdown
4. Real-time updates (refresh every 30 seconds)
**Use statistics to:**
* Monitor recruitment pace
* Estimate time to target N
* Identify technical issues (high dropout)
* Adjust recruitment if needed
### Validation Before Publishing
**Cajal checks experiment before publishing:**
**What gets validated:**
* All components have valid properties
* No broken image links
* All text elements have content
* Response components have valid keys configured
* Timeline structure makes sense
* No missing required fields
**Validation outcomes:**
**Pass (Green):**
* "Ready to publish"
* No issues found
* Publish button enabled
**Warnings (Yellow):**
* "Recommended fixes but can publish"
* Examples: No practice trials, long experiment, no breaks
* You can still publish, but consider fixes
**Errors (Red):**
* "Must fix before publishing"
* Examples: Missing images, invalid response keys, broken flow
* Publish button disabled
* Fix errors then retry
**Common validation warnings:**
* "Experiment over 20 minutes - consider adding breaks"
* "No practice trials - participants may be confused"
* "Instructions don't explain response keys"
* "No consent form - check IRB requirements"
**How to fix:**
1. Review warnings/errors
2. Click error to jump to problematic component
3. Fix issue
4. Re-validate (automatic)
5. Publish when validation passes
***
## Tab 2: Collaborators (Team Sharing)
Invite team members to help build and refine experiments.
### Adding Collaborators
**Invite collaborators by email:**
**Steps:**
1. Share dialog → Collaborators tab
2. Enter collaborator email address
3. Select permission level (Viewer or Editor)
4. Click "Send Invitation"
5. Invitation sent to email
6. Collaborator appears in "Pending Invitations"
**What collaborator receives:**
* Email invitation with link
* Explanation of permission level
* "Accept" or "Decline" options
* Link to experiment (after accepting)
**After acceptance:**
* Collaborator added to "Active Collaborators" list
* Can access experiment based on permissions
* Receives notifications of changes (if enabled)
### Permission Levels
Three permission levels control what collaborators can do.
**Permission comparison:**
| Action | Viewer | Editor | Owner |
| --------------------- | ------ | ------ | ----- |
| View experiment | ✓ | ✓ | ✓ |
| Preview experiment | ✓ | ✓ | ✓ |
| Edit components | ✗ | ✓ | ✓ |
| Add/delete components | ✗ | ✓ | ✓ |
| Change settings | ✗ | ✓ | ✓ |
| Publish experiment | ✗ | ✓ | ✓ |
| Invite collaborators | ✗ | ✗ | ✓ |
| Change permissions | ✗ | ✗ | ✓ |
| Delete experiment | ✗ | ✗ | ✓ |
| Transfer ownership | ✗ | ✗ | ✓ |
**Viewer:**
* Read-only access
* Can view and preview
* Cannot make changes
* Good for: Stakeholders, advisors reviewing work
**Editor:**
* Full editing access
* Can build and modify experiment
* Can publish changes
* Cannot manage team or delete experiment
* Good for: Co-authors, research assistants, team members
**Owner:**
* Full control
* Only one owner per experiment
* Can transfer ownership to someone else
* Can delete experiment
* Good for: Primary investigator, lab manager
### Managing Collaborators
**View active collaborators:**
* Share dialog → Collaborators tab
* "Active Collaborators" section
* Shows: Name, email, permission level, date added
**Change permissions:**
1. Find collaborator in list
2. Click permission dropdown
3. Select new level (Viewer or Editor)
4. Save changes
5. Collaborator notified of permission change
**Remove collaborators:**
1. Find collaborator in list
2. Click "Remove" button
3. Confirm removal
4. Collaborator loses access immediately
5. Notified via email of removal
**Transfer ownership:**
1. Must be current owner
2. Select new owner from collaborators (must be Editor first)
3. Confirm transfer
4. You become Editor, they become Owner
5. Cannot be undone (new owner must transfer back)
### Pending Invitations
**View pending invitations:**
* "Pending Invitations" section
* Shows: Email, permission level, sent date, status
**Pending invitation actions:**
**Resend invitation:**
* Collaborator didn't receive or lost email
* Click "Resend"
* New email sent with invitation link
**Revoke invitation:**
* Changed mind about inviting
* Click "Revoke"
* Invitation cancelled
* If they click link, shows "Invitation expired"
**Expiration:**
* Invitations expire after 7 days
* Must resend if expired
* Prevents stale invitations
### Real-Time Collaboration
**When multiple people edit:**
* See who else is viewing/editing
* Presence indicators show active collaborators
* Changes sync automatically
* No explicit "save" needed - auto-saves
**Conflict handling:**
* If two people edit same component simultaneously
* Last save wins (later timestamp)
* System alerts you if your changes were overwritten
* Can view change history to recover
**Best practices:**
* Communicate with team about who's editing what
* Use comments or notes to coordinate
* Don't edit same components simultaneously
* Review changes in version history if conflicts occur
***
## Tab 3: Community (Public Repository)
Submit your experiment to Cajal's public repository for others to use.
### Submitting to Community
**What is the community repository:**
* Public collection of experiments
* Shared by researchers
* Discoverable by psychology community
* Template library for others to use
**Why submit:**
* Share validated paradigms
* Contribute to open science
* Increase citations (link to your paper)
* Help other researchers
**How to submit:**
1. Share dialog → Community tab
2. Click "Submit to Community"
3. Fill in required and optional information
4. Submit for moderator review
5. Wait for approval (typically 1-2 weeks)
6. Experiment appears in public repository if approved
### Required Information
**Must provide:**
**1. Experiment Title**
* Clear, descriptive title
* Include paradigm name if applicable
* Example: "Classic Stroop Task (160 trials)"
**2. Category**
* Select primary category:
* Cognitive Psychology
* Perception
* Memory
* Attention
* Social Psychology
* Clinical Psychology
* Developmental
* Neuroscience
* Surveys/Questionnaires
* Other
**3. Description**
* Brief description of experiment (500 char limit)
* What does it measure?
* Key features
* Example: "Classic Stroop color-word interference task with 160 trials (80 congruent, 80 incongruent). Includes practice trials and automatic scoring."
### Optional Information
**Recommended to provide:**
**Research Area (Subcategory):**
* More specific than main category
* Examples:
* Working Memory
* Selective Attention
* Facial Recognition
* Moral Judgment
* Anxiety Disorders
**Paper DOI or URL:**
* Link to published paper using this paradigm
* DOI format: `10.1037/xxxxx`
* Or URL to preprint/paper
**Citation (APA format):**
* Full reference for your paper
* Proper APA 7th edition formatting
* Example: "Smith, J., & Doe, A. (2024). Title of paper. Journal Name, 10(2), 123-145. [https://doi.org/10.xxxx](https://doi.org/10.xxxx)"
**Tags:**
* Up to 5 keywords
* Lowercase, comma-separated
* Examples: "stroop, interference, attention, reaction time, cognitive control"
* Helps discoverability
### Approval Process
**Moderator review:**
**What moderators check:**
1. **Technical validity** - Experiment works correctly
2. **Scientific quality** - Appropriate methodology
3. **Completeness** - Instructions clear, all components present
4. **Compliance** - Follows community guidelines
5. **Appropriate content** - No harmful or unethical studies
**Review timeline:**
* Submission received notification
* Review within 1-2 weeks
* Approval/rejection email
* If rejected, reason provided with option to resubmit
**Approval criteria:**
* Experiment runs without errors
* Clear instructions for participants
* Standard or well-validated paradigm
* Ethical and appropriate for public use
* Proper attribution (citations if replicating published work)
**After approval:**
* Experiment appears in Community Repository
* Public can view, duplicate, and use
* You maintain ownership of original
* Can update anytime (requires re-approval for changes)
### After Approval
**Community experiment benefits:**
**Public visibility:**
* Appears in searchable repository
* Discoverable by keyword, category, tags
* Increases reach and impact
**Usage statistics:**
* View count - How many people viewed your experiment
* Duplicate count - How many people copied it
* Like/favorite count - Community interest metric
**Recognition:**
* Citation tracking (if paper linked)
* Attribution shown to all users
* Your research visible to global community
**Maintenance:**
* You can update approved experiments
* Updates require re-approval
* Original submission always available
* Version history maintained
***
## Testing Your Shared Experiment
**Before distributing to real participants:**
### Test in New Tab
**"Test in New Tab" button:**
1. Share dialog → Public Link tab
2. Click "Test in New Tab"
3. Opens experiment in participant view
4. New browser tab, simulates real participant
5. Complete experiment as participant would
**What to check:**
* Link loads correctly
* All images display
* Instructions clear
* Response collection works
* Timing feels appropriate
* Completion code appears (if used)
### Test on Different Devices
**Devices to test:**
* **Desktop browser** - Chrome, Firefox, Safari
* **Mobile phone** - If participants will use mobile
* **Tablet** - If applicable
* **Different screen sizes** - Ensure responsive
**What can go wrong:**
* Images too large for mobile screen
* Text too small to read
* Buttons too small to tap
* Layout breaks on narrow screens
**Fix before distributing:**
* Adjust responsive settings
* Test on actual devices
* Get feedback from colleague on different device
### Test with Colleague
**Naive user test:**
1. Send link to colleague unfamiliar with experiment
2. Ask them to complete without explanation
3. Don't guide or answer questions
4. Note what confuses them
5. Fix unclear instructions or issues
6. Retest until smooth experience
**What to ask after:**
* Were instructions clear?
* Any confusing parts?
* Any technical issues?
* How long did it take?
* Any suggestions?
***
## Completion Codes
Verify participant completion for paid studies.
### Configuring Completion Codes
**Settings:**
1. Share dialog → Public Link tab
2. Advanced Settings → "Completion Code"
3. Choose code format
**Code format options:**
* **Random** - Random alphanumeric string (e.g., "X7K9P2")
* **Sequential** - Sequential numbers (e.g., "CAJAL-0001", "CAJAL-0002")
* **Custom template** - Define your own pattern with variables
**Custom template variables:**
* `{sessionId}` - Unique session identifier
* `{random}` - Random string
* `{timestamp}` - Completion time
* `{participantId}` - If collected
**Example custom:**
```
Template: "CAJAL-{sessionId}-{random}"
Generates: "CAJAL-abc123-X7K9"
```
### Showing Codes to Participants
**Automatic display:**
* Completion code shown at end of experiment
* Full-screen display
* Instructions: "Copy this code and paste into \[platform]"
* Button to copy code to clipboard
**What participants do:**
1. Complete experiment
2. See completion code
3. Copy code (click copy button or select text)
4. Return to Prolific/MTurk/etc.
5. Paste code to verify completion
6. Submit for payment
### Verifying Completion
**Platform-specific verification:**
**Prolific:**
* Participant enters code in Prolific
* You review and approve submissions
* Match code to Cajal data using PROLIFIC\_PID
* Approve payments
**MTurk:**
* Worker enters code to submit HIT
* You check code validity
* Approve payments for valid codes
**Manual verification:**
1. Export data from Cajal
2. Column shows completion codes
3. Match participant submissions to codes
4. Verify completion before payment
**Tip:** Use automatic redirect instead of manual codes when possible (less error-prone).
***
## Settings Reference
Quick reference for all sharing settings.
| Setting | What It Does | When to Use | Options |
| -------------------- | ------------------------------------ | -------------------------- | -------------------------- |
| **Public Access** | Makes experiment accessible via link | Always for data collection | ON/OFF |
| **Max Participants** | Limits total completions | Fixed sample size studies | Number or Unlimited |
| **Expiration Date** | Auto-closes recruitment | Time-limited studies | Date/time or Never |
| **Email Collection** | Collects participant emails | Longitudinal, recontact | Disabled/Optional/Required |
| **Name Collection** | Collects participant names | IRB requirements | Disabled/Optional/Required |
| **Deduplication** | Prevents repeat participation | Most studies | None/IP/Fingerprint/Strict |
| **Cooldown Period** | Time before re-participation | Longitudinal designs | Days |
| **Consent Form** | Custom consent text | IRB compliance | Custom text |
| **Completion Code** | Verification code | Platform payments | Random/Sequential/Custom |
***
## Troubleshooting
### Common Issues
**Link Not Working**
**Symptom:** Participants can't access experiment
**Causes:**
* Experiment not published (still draft)
* Public access toggled OFF
* Link expired (expiration date passed)
* Max participants reached
**Solutions:**
1. Check experiment status (must be "Published")
2. Verify "Make Public" toggle is ON
3. Check expiration date hasn't passed
4. Check participant limit not reached
5. Re-publish if needed
**Participants Can't Complete**
**Symptom:** Participants start but can't finish
**Causes:**
* Validation errors in experiment
* Missing required form fields
* Broken image links
* Response keys not configured
* Browser compatibility issues
**Solutions:**
1. Preview entire experiment yourself
2. Check for validation warnings
3. Test on different browsers
4. Fix missing/broken content
5. Re-publish after fixes
**Data Not Collecting**
**Symptom:** Participant completes but no data in database
**Causes:**
* Components missing response configuration
* Database connection issues (rare)
* Participant closed browser early
* Network issues during submission
**Solutions:**
1. Verify all response components have response configuration
2. Check data export - may be collecting but not visible in interface
3. Test data collection with preview mode
4. Check that "Save responses" is enabled for components
**Too Many Participants**
**Symptom:** Over-recruited, too much data
**Prevention:**
* Set max participants limit beforehand
* Monitor progress regularly
* Close recruitment when approaching target
**If already happened:**
* Use first N participants
* Or randomly sample from full dataset
* Document in methods
**Duplicate Responses**
**Symptom:** Same person completed multiple times
**Prevention:**
* Enable deduplication before launching
* Use strict method (IP + fingerprint + ID)
**If already happened:**
* Check for duplicate IDs (Prolific PID, email, etc.)
* Remove duplicates in analysis
* Keep first or last submission (document choice)
***
## Best Practices
### Before Sharing
**Pre-flight checklist:**
* [ ] Preview entire experiment
* [ ] Test on target devices
* [ ] Colleague review (naive user)
* [ ] Validate before publishing
* [ ] Set appropriate participant limit
* [ ] Configure expiration date if needed
* [ ] Enable deduplication
* [ ] Test platform integration (Prolific link works)
### During Data Collection
**Monitor regularly:**
* Check completion rate
* Watch for high dropout (indicates problem)
* Review first few participants' data
* Respond to participant questions promptly
* Adjust recruitment if needed
**Don't:**
* Make major changes to published experiment
* Change settings mid-recruitment (creates inconsistency)
* Ignore dropout patterns
### After Data Collection
**Close recruitment:**
* Toggle "Make Public" OFF when target reached
* Or set expiration date
* Prevents accidental additional data
**Data management:**
* Export data immediately
* Back up raw data
* Document any exclusions
* Store securely per IRB requirements
***
## Next Steps
Now that you understand sharing:
Test before sharing with participants
Build or refine your experiment
Configure trial variations
Get help improving your experiment
Sharing connects your experiments to participants and collaborators. Whether collecting data from hundreds of participants or collaborating with team members, the Share dialog provides all the tools you need for successful psychology research.